Tools Menu
The Tools tab consists of settings and preferences that you can modify. You can access the Plugin Store to download more features that will improve your Broadcaster experience.
Plugin Store
Permissions
Stream Sharing
Audio Mixer
Audio Effects
You can add additional sources, extensions, and outputs by installing plugins from the Plugin Store. Your currently installed plugins are accessed by selecting My Plugins under the Tools tab.
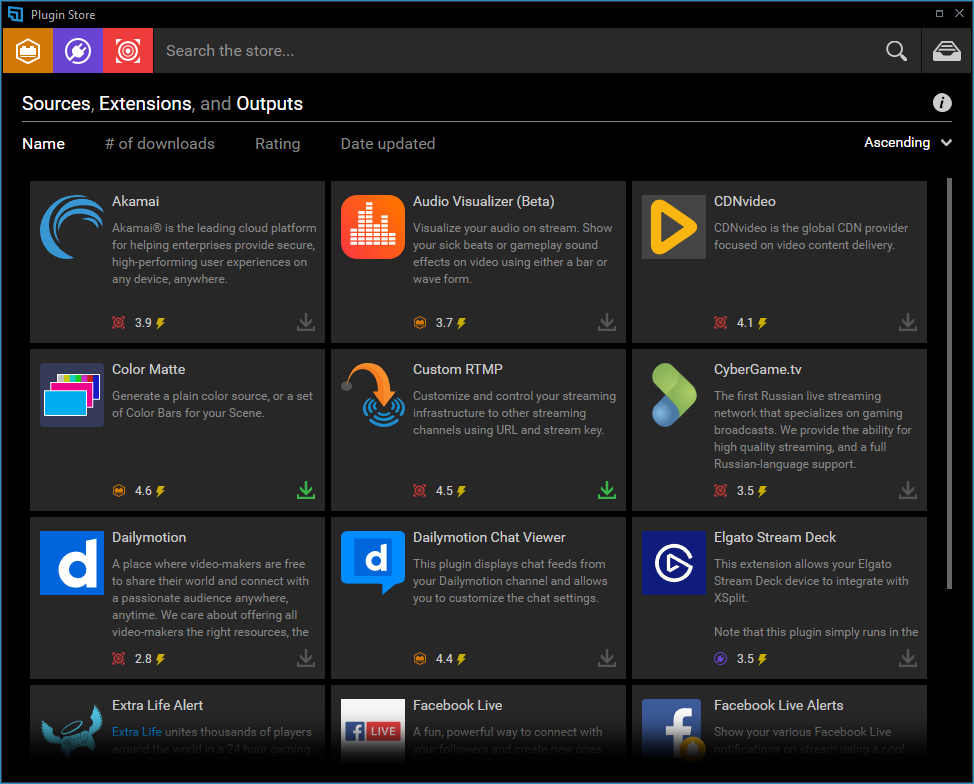
There are three types of Plugins you can install in XSplit Broadcaster:
Sources are plugins that are placed on the stage such as chat viewers, live alerts, and more.
Extensions are small programs that add features and expands XSplit Broadcaster’s capabilities.
Outputs support the most popular streaming platforms such as Twitch, YouTube Live, Facebook Live, etc.
To install a plugin, just select it then click the Install button.
In the Plugin Store, you can use the search bar and click the Magnifying Glass button to search for a particular plugin.
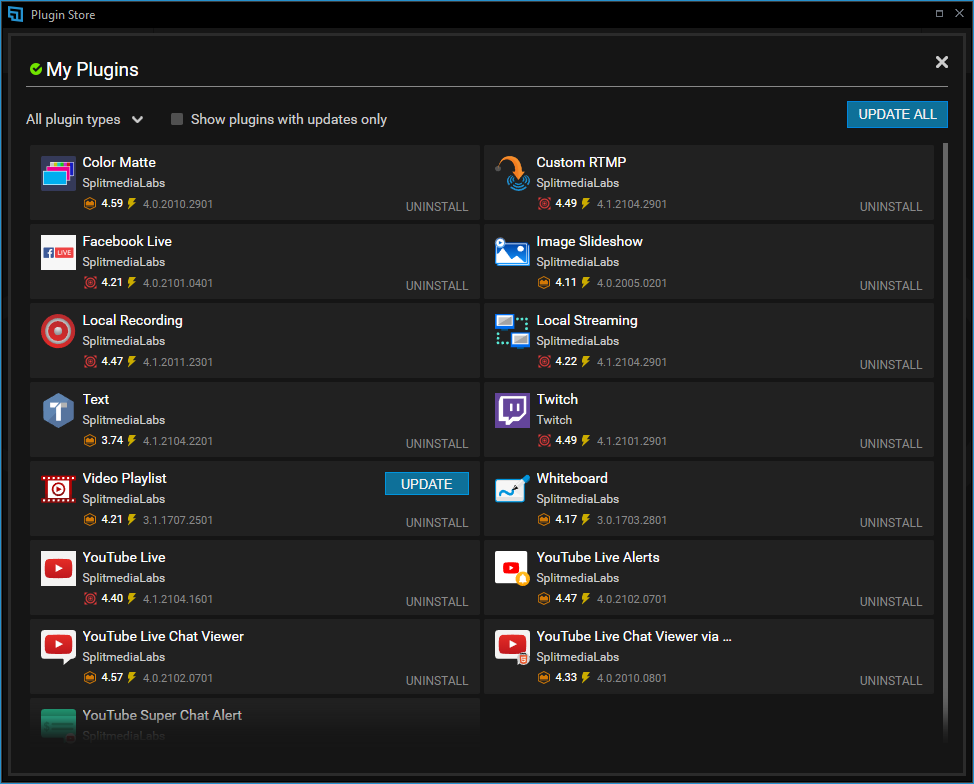
You can see all of your installed plugins by clicking the Show My Plugins button on the upper right corner of the Plugin Store window.
You can update all of your plugins by clicking UPDATE ALL button or each plugin by clicking UPDATE button. You can also uninstall plugins by clicking UNINSTALL.
Some plugins will require permissions to run scripts in order to work. These include extensions provided by XSplit as well.
When attempting to use a source or extension that requires script permissions, this alert prompt will also be shown at the top bar of XSplit Broadcaster's staging.
To allow access, click EDIT PERMISSIONS to open the Permissions window.
On the Permissions window, check the box beside the source or extension you want to allow access to and click OK.
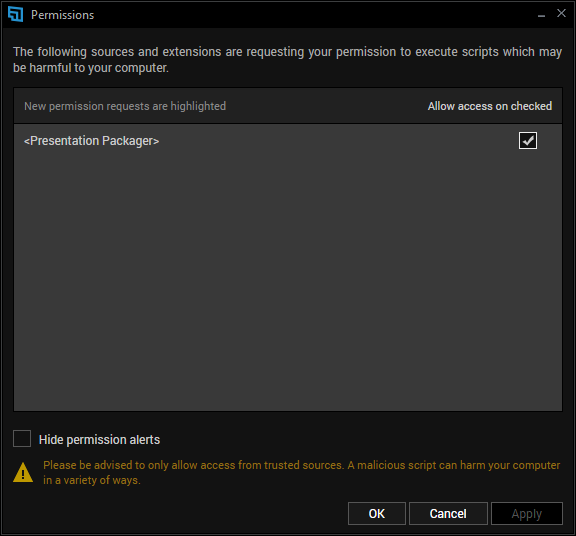
You can also access the Permissions window by going to Tools then clicking Permissions.
Let your audience know that you are streaming live.
Select Share my stream... and have the freedom to share your live post on Twitter directly from XSplit Broadcaster. This feature can only be done if you are currently live.
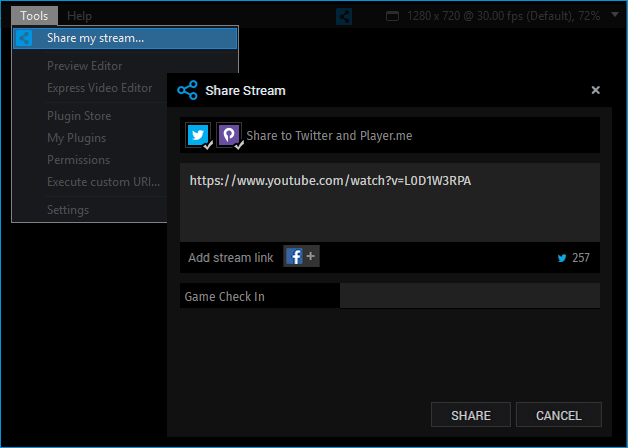
Click on the social media icons where you want to share your live post. You'll be prompted to authenticate your social account if you haven't authorized any of them on your Sharing Settings.
Click on any Add Stream Link button to add the link of any active broadcast.
Game Check-In
This allows you to tag a game you are currently playing on a Player.me post.
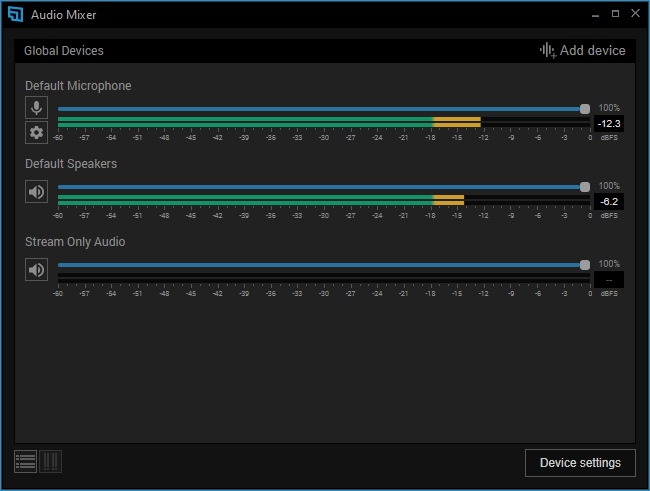
Monitor and adjust the audio levels of your devices individually.
Go to Tools > Audio Mixer.
The audio levels are shown as dBFS (Decibel relative to Full Scale). It is recommended to keep it below the red range to prevent audio clipping.
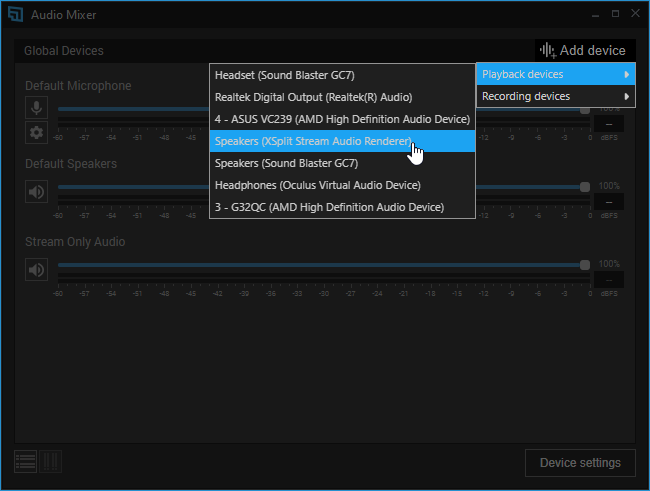
Add audio devices by clicking on Add Devices, selecting either Playback Devices or Recording Devices and choose the specific device that you want to add.
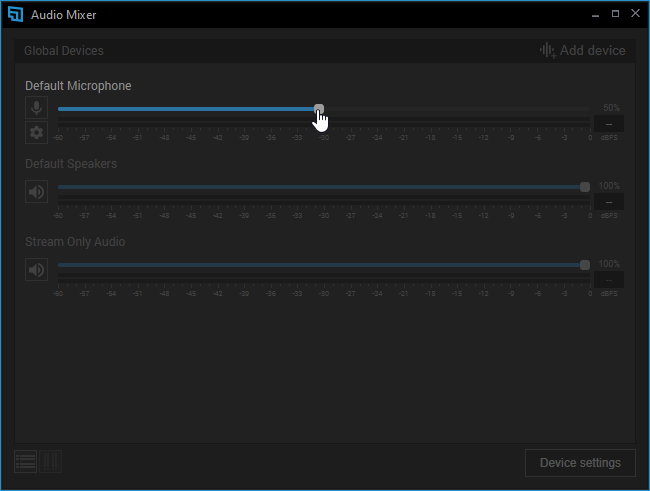
Adjust the volume of the audio devices by adjusting the slider based on your desired value.
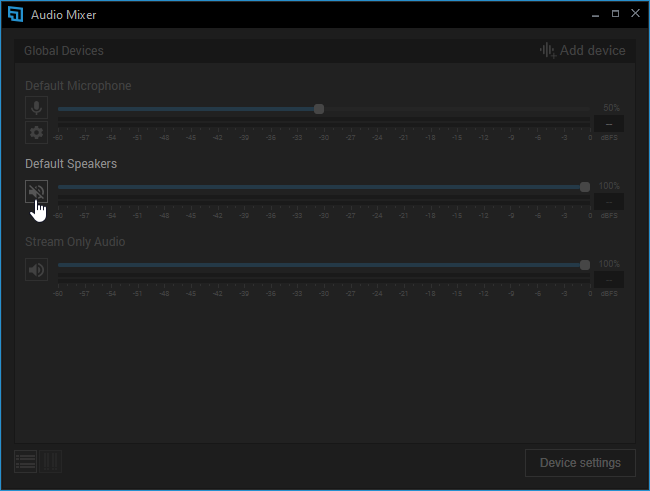
Mute any of the audio devices by clicking the Speaker or Microphone icon.
You can change the orientation of the Audio Mixer by clicking on either Vertical button or Horizontal button.
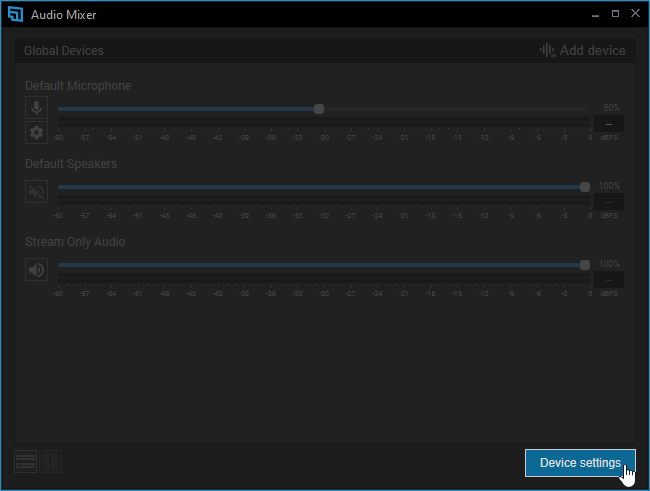
Configure your Audio Settings by clicking Device Settings. For more information, click here.
Apply different effects to enhance the quality of your audio input device. The Audio Effects properties can be accessed by either going on Tools > Audio Effects or clicking the gear icon below the microphone dropdown tool in Audio settings tab.
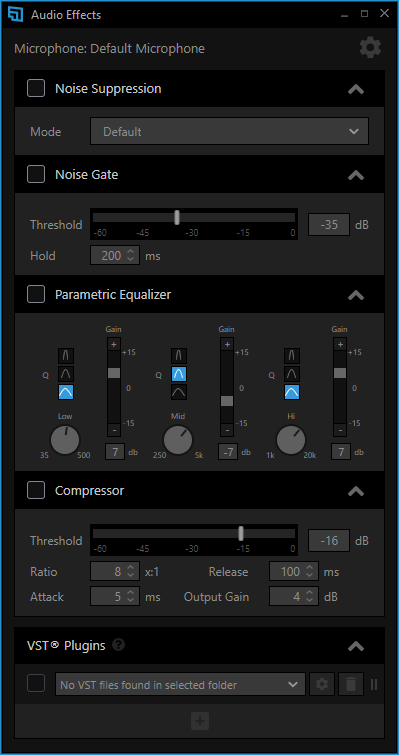
Remove background noise from your microphone by enabling Noise Suppression. It will detect the noise and eliminate it from your output. You can also choose NVIDIA Noise Removal if you have an NVIDIA RTX-series GPU.
As compared to Noise Suppression which automatically detecting the noise, Noise Gate lets you manually set a threshold level which allows your audio to pass when above and blocks your audio when below that level.
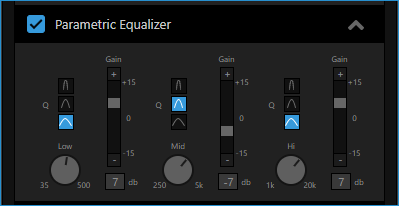
Parametric Equalizer gives you continuous quality control and balance of audio frequencies (Hi, Mid, and Low tones).
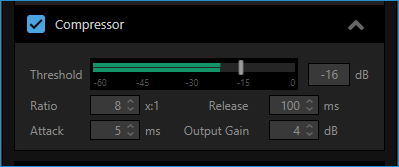
Compressor allows you to manually set a threshold level so that all audio signals above the threshold will sound the same in loudness and the audio signals below it are unchanged.
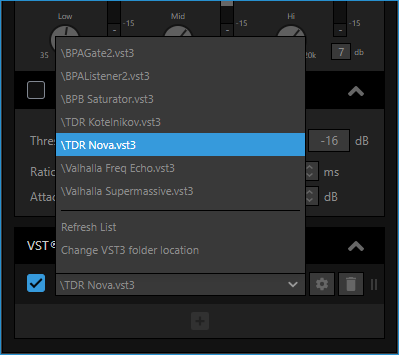
XSplit Broadcaster V4.2 or newer now supports VST3 Plugins.
Add your VST3 Plugin in XSplit Broadcaster by placing your VST3 files on the default location in C:\\Program Files\\Common Files\\VST3\\ or set your own location.
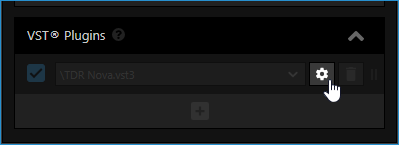
Once enabled, you can change your VST3 Plugin settings by clicking on the gear icon beside the VST3 Plugin drop-down menu.
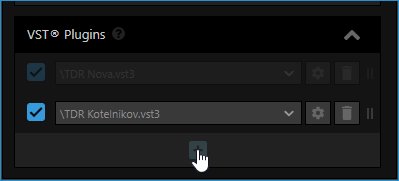
Enable more VST3 Plugins by clicking the plus icon below the VST3 Plugin drop-down menu.
Click here for a list of VST3 plugins currently tested and known to work with XSplit Broadcaster
Plugin Store
Permissions
Stream Sharing
Audio Mixer
Audio Effects
Plugin Store
You can add additional sources, extensions, and outputs by installing plugins from the Plugin Store. Your currently installed plugins are accessed by selecting My Plugins under the Tools tab.
There are three types of Plugins you can install in XSplit Broadcaster:
Sources are plugins that are placed on the stage such as chat viewers, live alerts, and more.
Extensions are small programs that add features and expands XSplit Broadcaster’s capabilities.
Outputs support the most popular streaming platforms such as Twitch, YouTube Live, Facebook Live, etc.
To install a plugin, just select it then click the Install button.
In the Plugin Store, you can use the search bar and click the Magnifying Glass button to search for a particular plugin.
You can see all of your installed plugins by clicking the Show My Plugins button on the upper right corner of the Plugin Store window.
You can update all of your plugins by clicking UPDATE ALL button or each plugin by clicking UPDATE button. You can also uninstall plugins by clicking UNINSTALL.
Permissions
Some plugins will require permissions to run scripts in order to work. These include extensions provided by XSplit as well.
When attempting to use a source or extension that requires script permissions, this alert prompt will also be shown at the top bar of XSplit Broadcaster's staging.
To allow access, click EDIT PERMISSIONS to open the Permissions window.
On the Permissions window, check the box beside the source or extension you want to allow access to and click OK.
You can also access the Permissions window by going to Tools then clicking Permissions.
Stream Sharing
Let your audience know that you are streaming live.
Select Share my stream... and have the freedom to share your live post on Twitter directly from XSplit Broadcaster. This feature can only be done if you are currently live.
Click on the social media icons where you want to share your live post. You'll be prompted to authenticate your social account if you haven't authorized any of them on your Sharing Settings.
Click on any Add Stream Link button to add the link of any active broadcast.
Game Check-In
This allows you to tag a game you are currently playing on a Player.me post.
Audio Mixer
Monitor and adjust the audio levels of your devices individually.
Go to Tools > Audio Mixer.
The audio levels are shown as dBFS (Decibel relative to Full Scale). It is recommended to keep it below the red range to prevent audio clipping.
Add audio devices by clicking on Add Devices, selecting either Playback Devices or Recording Devices and choose the specific device that you want to add.
Adjust the volume of the audio devices by adjusting the slider based on your desired value.
Mute any of the audio devices by clicking the Speaker or Microphone icon.
You can change the orientation of the Audio Mixer by clicking on either Vertical button or Horizontal button.
Configure your Audio Settings by clicking Device Settings. For more information, click here.
Audio Effects
Apply different effects to enhance the quality of your audio input device. The Audio Effects properties can be accessed by either going on Tools > Audio Effects or clicking the gear icon below the microphone dropdown tool in Audio settings tab.
Noise Suppression
Remove background noise from your microphone by enabling Noise Suppression. It will detect the noise and eliminate it from your output. You can also choose NVIDIA Noise Removal if you have an NVIDIA RTX-series GPU.
Noise Gate
As compared to Noise Suppression which automatically detecting the noise, Noise Gate lets you manually set a threshold level which allows your audio to pass when above and blocks your audio when below that level.
Parametric Equalizer
Parametric Equalizer gives you continuous quality control and balance of audio frequencies (Hi, Mid, and Low tones).
Compressor
Compressor allows you to manually set a threshold level so that all audio signals above the threshold will sound the same in loudness and the audio signals below it are unchanged.
VST3 Plugin
XSplit Broadcaster V4.2 or newer now supports VST3 Plugins.
Add your VST3 Plugin in XSplit Broadcaster by placing your VST3 files on the default location in C:\\Program Files\\Common Files\\VST3\\ or set your own location.
Once enabled, you can change your VST3 Plugin settings by clicking on the gear icon beside the VST3 Plugin drop-down menu.
Enable more VST3 Plugins by clicking the plus icon below the VST3 Plugin drop-down menu.
Click here for a list of VST3 plugins currently tested and known to work with XSplit Broadcaster
Updated on: 11/08/2022
Thank you!