Creating and Using LUTs in XSplit Broadcaster
Creating and using LUTs for color correcting or grading
In this guide, we're going to be talking about how you can color correct your footage using LUTs and hopefully explain what LUTs are and how you can create your own.
What is needed?
- XSplit Broadcaster - Download XSplit Broadcaster from the website
- Base LUT file - Download the Base LUT file
- Image Editing Software that allows color channel tweaking (Adobe Photoshop is used in this tutorial)
- (Optional) LUT Pack - View Forum Post with LUT pack
Color correcting or color grading allows you to change the look or feel of your webcam and videos in a way that makes it more creative or simply to fix and balance color issues. Color Lookup tables (LUTs) are a technique used to remap colors of an image to another color. Whilst that might sound confusing, I think seeing it in practice will make a lot more sense. In this guide, we’re going to be using these techniques to achieve the following of which can be used whilst you’re streaming or recording:
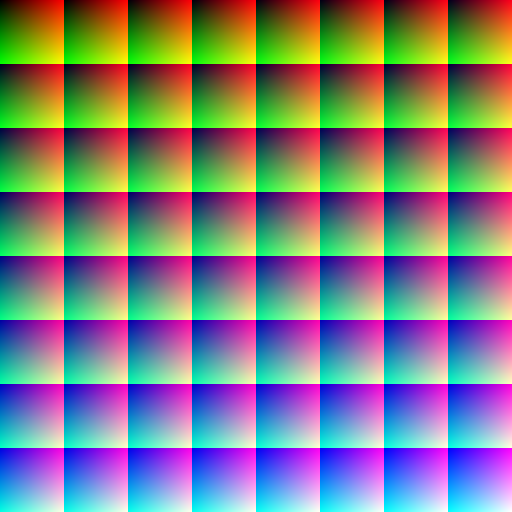
As you can see, using a LUT we were able to dramatically change the coloring of a shot by leaving only the blue colors. So what is a LUT and what does it look like? Below is the base or original LUT image that doesn’t have any coloring affects applied to it. It’s a massive image of color that covers the entire spectrum. If you change a specific pixel of color to an entirely different color, applying that as a LUT would replace that color.
Original LUT
So now that we know how the LUT is manipulating the image colors, how do we go about creating one? More importantly, how do we add it into XSplit Broadcaster? The latest version of XSplit Broadcaster has the ability to apply LUT's as well as an assortment of other effects.
Before we apply the LUT to our webcam, video or other source in Broadcaster, we first need to create it. To do this, we’ll start from a blank slate using the Unmodified LUT image. Open a copy of this in your image editing software which in my case is Photoshop.
Now we could start editing this image but it wouldn’t really give us a good indication to how it’s actually really going to look. Because of this, you should make a screenshot of your webcam or whichever source you plan to apply the LUT to and then open it in Photoshop. Let’s create the leave color effect first. When creating these effects, we’ll always use adjustment layers to make it easy to apply them to the original LUT image.
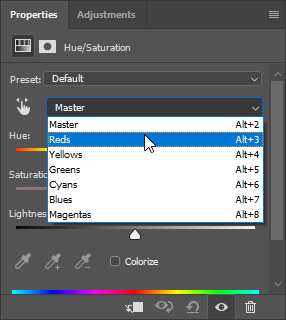
So, first step is to click Create new fill or adjustment layer > Hue/Saturation. We’re using this because we plan to saturate out the color channels we don’t want. In this event, I’m going to reduce saturation of all colors except for blue.
If you click the dropdown where it says master, you’ll see all of the colors you can manipulate. Because we want blue, we’ll desaturate everything except for master, blues & cyans by dragging the saturation slider all the way to the left for each of the colors.
Once you’ve tweaked the values and your reference image is looking how you want it to, it’s time to move the work you’ve done to the original LUT file. You can either do this by right clicking the adjustment layers, going to Duplicate Layer and then from the dialog that shows, click the document dropdown and choose ‘original.png’. Or by copy and pasting the adjustment layer from the document to the Original LUT File document. This will then place the adjustment layer on the LUT file and you should immediately see a difference.
Next step is to save out the edited LUT file as a PNG. Using Ctrl + Shift + S or File -> Save As, we’re going to save the new LUT to the desktop and call it ‘leave_blue.png’. That’s all the editing out the way, it’s time to add the new LUT using the new filters tab found within the effects tab.
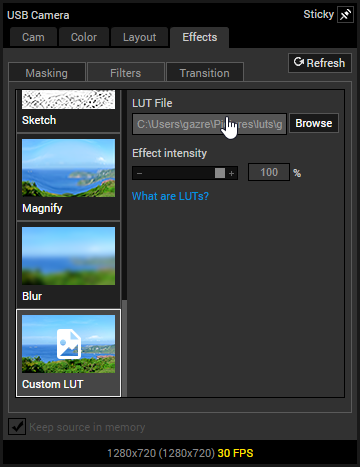
Now for the easy part. To apply your new LUT that you've just created, right click the source you want to add it to in XSplit Broadcaster. From the properties menu click the effects tab and then click the filters tab below that. On the left is a list of filters and effects you can apply, scroll down to the bottom of the list and click Custom LUT. Click Browse, navigate to your modified LUT file and then click Open. You should now see that your LUT has been applied to your chosen source.
So with that, you should have now successfully created a new, custom LUT and applied that to your source. I hope you learned a little and now have the knowledge to color grade/correct your XSplit Broadcaster sources using the power of LUTs.
Too long, didn't read (TL;DR) version:
- Open a reference image in photoshop
- Using adjustment layers, modify the reference image to your liking
- Open the original LUT file in Photoshop
- Copy the adjustment layers from the reference image to the original LUT
- Save out the LUT image with a custom name, make sure it’s PNG
- Right click your webcam or game source in XSplit Broadcaster and click the effects tab
- Click the filters tab and then scroll down to the bottom and click custom LUT
- Click Browse and then navigate to your modified LUT file then click Open
- Done!
Updated on: 11/08/2022
Thank you!